 Save
Save Black currant panna cotta arrived in my life during a farmers market wandering on a purple-skied afternoon. I'd never seen black currants before that day, their deep jewel tones catching light like tiny dark stars, and something about their tartness against the cream's silk made me pause at the vendor's table. That evening, I attempted my first batch alone in the kitchen, nervous about the gelatin, but the quiet magic of watching warm cream transform into something that holds its shape felt like learning a small secret. Now it's the dessert I make when I want to feel a little refined without the stress.
I served this at a dinner party where someone had brought a Moscato, and the pairing was so perfect it felt accidental and intentional at once. Watching my mother-in-law close her eyes after the first spoonful, then smile without saying anything, made the whole chilling wait worth it. That's when I knew this recipe wasn't just about technique—it was about those quiet moments when food speaks louder than conversation.
Ingredients
- Heavy cream (2 cups): This is your base, your foundation—don't skimp on quality here because it's literally the main ingredient you're tasting.
- Whole milk (1/2 cup): It lightens the richness just enough so the panna cotta stays silky rather than becoming heavy.
- Granulated sugar (1/2 cup for base, 3 tablespoons for currants): Split between components to let each layer shine without becoming cloying.
- Powdered gelatin (1 1/2 teaspoons): The critical ingredient that transforms liquid into that wobbling perfection—blooming it first prevents lumps.
- Cold water (2 tablespoons for bloom, 2 for currants): Temperature matters, so keep that blooming water genuinely cold.
- Pure vanilla extract (1 teaspoon): A single teaspoon is enough to add depth without competing with the black currants.
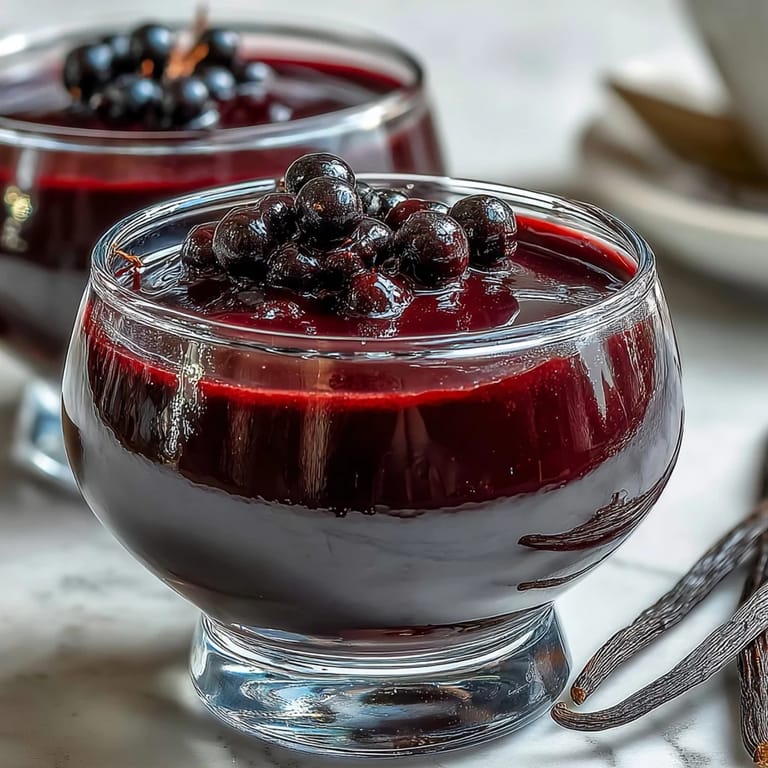
- Fresh or frozen black currants (1 cup): Either works beautifully, though frozen sometimes releases their juice more readily—I've found them equally reliable.
- Black currant jam (1/3 cup, optional): The glaze is optional but transforms the whole presentation from simple to something you'd see plated at a restaurant.
Tired of Takeout? 🥡
Get 10 meals you can make faster than delivery arrives. Seriously.
One email. No spam. Unsubscribe anytime.
Instructions
- Bloom the gelatin:
- Sprinkle gelatin over cold water in a small bowl and let it sit undisturbed for 5 minutes. You'll see it absorb the water and become spongy—this step prevents lumps when you whisk it into the warm cream.
- Warm the cream mixture:
- Combine heavy cream, milk, and sugar in a medium saucepan and heat gently over medium heat, stirring often until the sugar dissolves completely. Watch for steam rising, but stop before you see any bubbles breaking the surface.
- Bring gelatin into the cream:
- Remove the saucepan from heat, add the bloomed gelatin and vanilla extract, and whisk steadily until the gelatin disappears completely into the warm cream. The residual heat does the dissolving work for you.
- Cook down the black currants:
- In a separate saucepan, combine black currants, sugar, and water over medium heat and simmer for 5 to 7 minutes until the berries burst and their juice darkens. You'll smell something deeply tart and wonderful rising from the pot.
- Strain the berry mixture:
- Pour the cooked currants through a fine sieve set over a bowl, pressing gently with the back of a spoon to coax out every drop of juice and color. The solids go to waste, but that liquid is pure fruit intensity.
- Combine cream and currants:
- Whisk the strained black currant puree into the warm cream mixture until the color is even and the tanginess is distributed throughout. The pale cream will shift to a soft mauve.
- Chill in ramekins:
- Pour the mixture into 4 lightly greased ramekins or dessert glasses and let them cool to room temperature on the counter before transferring to the refrigerator. Set them for at least 4 hours, though overnight is even better for a truly set texture.
- Optional glaze finish:
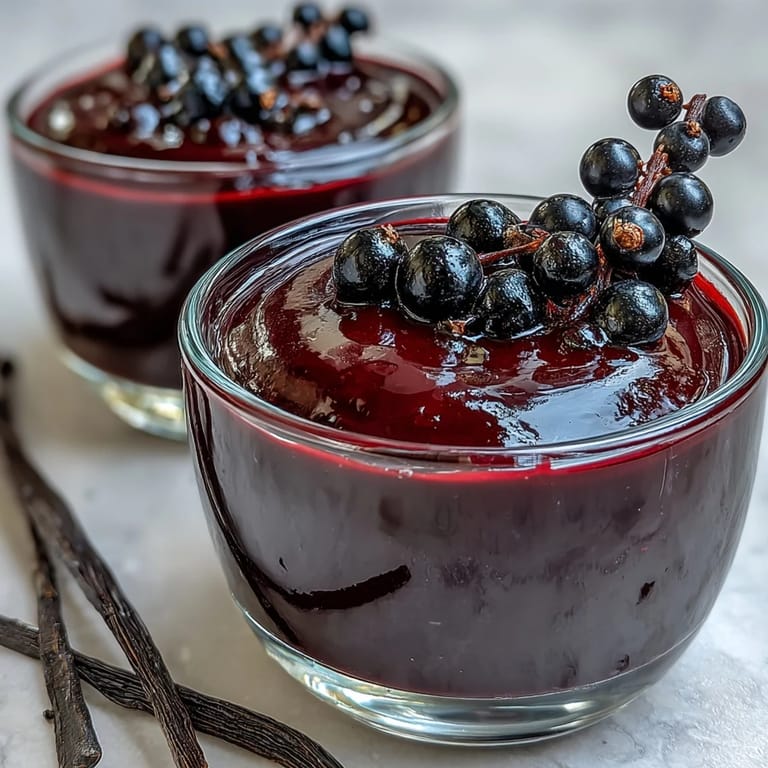
- If you're adding the glaze, warm the black currant jam with 1 tablespoon water in a small saucepan until it loosens into a pourable sauce. Spoon a thin layer over each chilled panna cotta just before serving for that glossy, jeweled look.
 Save
Save There's a moment, around hour three of chilling, when you can't help but open the refrigerator to check if it's set yet. I've done this countless times, each time feeling like a small impatient child despite knowing it needs the full four hours. That moment of anticipation is part of why I love making this—it builds a kind of gentle suspense.
Why Black Currants Work Magic Here
Black currants have this distinctive tartness that's nothing like raspberries or strawberries—they're almost grassy with a dark, concentrated flavor that actually becomes sweeter the more you cook them. I've tried substituting them with blackberries when currants weren't available, and while blackberries are lovely, they lack that sophisticated edge. The currants also give the panna cotta a luxurious color that feels special on its own, like you've captured something rare in a glass.
The Texture Secret
The magic of panna cotta lives in that wobble—it should jiggle slightly when you shake the ramekin, not sit firm like a custard tart. This happens because of the precise ratio of gelatin to liquid; too much and you get rubbery mouthfeel, too little and it stays pourable. I learned this by accident when I once doubled the gelatin and ended up with something that felt more like a gummy bear than an elegant Italian dessert. Now I measure carefully and trust the science.
Serving and Pairing Possibilities
Serve these chilled straight from the refrigerator, never at room temperature, because the structure starts to collapse as soon as the temperature rises. A Moscato d'Asti feels like the natural pairing—something slightly fizzy and a little sweet to echo the black currants—though a dry Prosecco cuts through beautifully if you want something crisper. Fresh black currants scattered on top or a small dollop of unsweetened whipped cream adds visual interest and a textural contrast.
- Make these up to two days ahead and keep them covered in the refrigerator so they don't absorb flavors from other foods.
- If you can't find black currants anywhere, frozen blackberries or blueberries work as respectable understudies.
- The optional jam glaze is what pushes this from weeknight dessert to company-worthy show-off, so include it when you're trying to impress.
 Save
Save This recipe has quietly become my answer whenever someone asks what I'd make if I wanted to feel fancy in my own kitchen. It's one of those dishes that reminds you that elegance doesn't always require complexity.
Common Questions
- → Can I make black currant panna cotta in advance?
Yes, this dessert is perfect for making ahead. You can prepare it up to 2 days in advance and store it covered in the refrigerator. Add the glaze shortly before serving for the best presentation.
- → What can I use if I can't find black currants?
Blackberries or blueberries work beautifully as substitutes. They provide similar tartness and color, though the flavor profile will be slightly sweeter and less intense than traditional black currants.
- → How do I know when the panna cotta is properly set?
Gently shake the ramekin—the panna cotta should wobble like jelly but hold its shape. It should feel firm to the touch but still silky when you dip a spoon into it. This usually takes 4 hours in the refrigerator.
- → Can I use agar agar instead of gelatin?
Yes, substitute the powdered gelatin with 2 teaspoons of agar agar powder. Note that agar sets more firmly than gelatin and has a slightly different texture, so you may prefer using a bit less for a creamier result.
- → What wine pairs best with this dessert?
Moscato d'Asti or Prosecco complement the creamy texture and tart berry flavors beautifully. The slight sweetness and effervescence of these Italian wines balance the richness of the custard perfectly.
- → How do I unmold panna cotta for serving?
Dip the bottom of the ramekin briefly in warm water for 5-10 seconds, then run a thin knife around the edge. Place a serving plate on top and invert quickly. If serving in glasses, simply skip this step and enjoy directly from the glass.