 Save
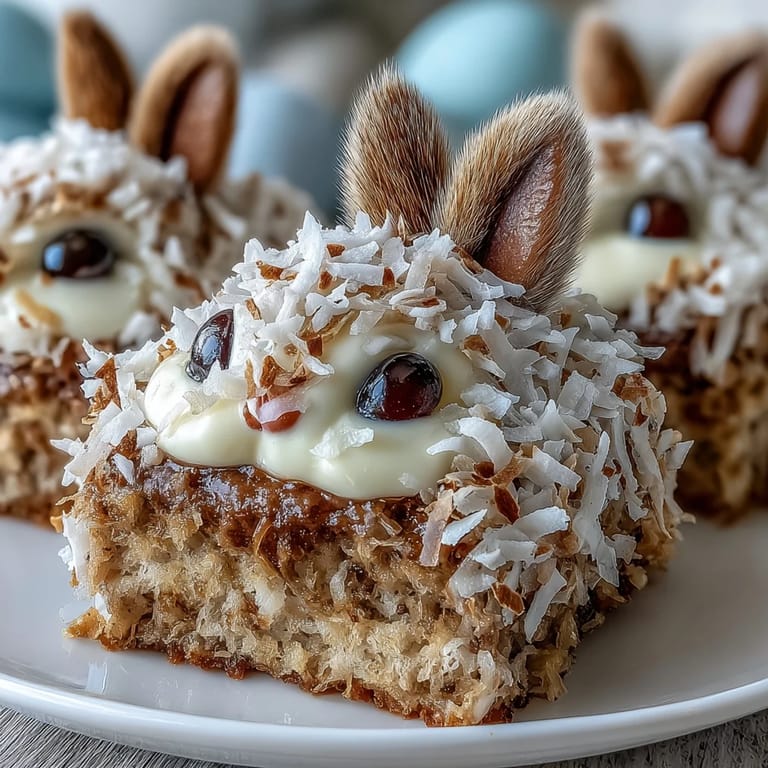
Save My daughter spotted the Easter Bunny cake at a bakery window and wouldn't stop talking about it for weeks. So one March afternoon, I decided to build one from scratch in our kitchen, armed with nothing but butter, coconut, and jelly beans. The moment she walked in and saw the bunny taking shape on the counter—ears standing proud, coconut fur getting fluffier by the minute—her face lit up in a way no store-bought cake ever could. That's when I realized this wasn't just a dessert; it was a small magic trick performed with flour and frosting. Now it's become our Easter tradition, the one thing she requests before anything else.
I'll never forget my neighbor peeking over the fence while I was assembling the bunny, asking if I'd paid someone to make it. When I told her I was building it myself, she didn't believe me until she watched the ears get frosted and the coconut start sticking. By the time the jelly bean tail went on, she was already asking for the recipe. Turns out, the secret to looking like a professional baker is just being willing to get a little messy and trust that coconut hides a multitude of imperfections.
Ingredients
- All-purpose flour (2 1/2 cups): The foundation of a tender, forgiving cake that holds its shape when you're sculpting it into a bunny.
- Unsalted butter (1 cup for cake, 1 cup for frosting): This is where the flavor lives; softened butter creams with sugar to create that light, pillowy crumb.
- Granulated sugar (1 3/4 cups): Not just sweetness—it aerates the batter when beaten with butter, giving the cake its delicate texture.
- Eggs (4 large, room temperature): Room temperature eggs blend smoothly and create a more cohesive batter than cold ones ever will.
- Vanilla extract (1 tbsp for cake, 2 tsp for frosting): The unsung hero that makes everything taste more like itself.
- Whole milk (1 cup): Alternating it with flour keeps the batter from getting tough or dense.
- Baking powder and baking soda (2 1/2 tsp and 1/2 tsp): These lift the cake gently so it stays tender enough to carve into bunny pieces.
- Powdered sugar (4 cups): Sift it before using—lumps in frosting are the enemy of smooth bunny fur.
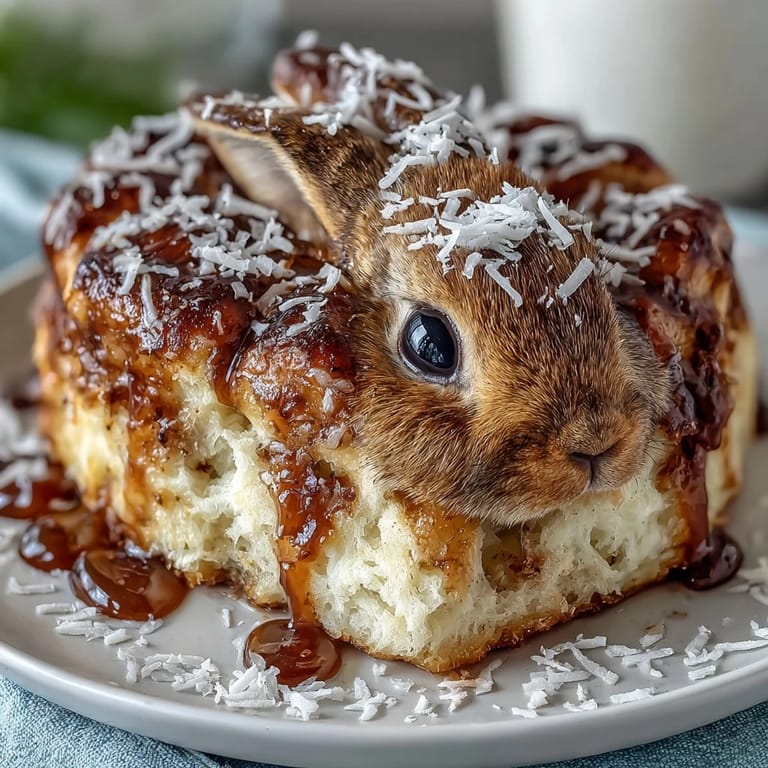
- Sweetened shredded coconut (2 cups): This is your bunny's coat; choose the kind that's finely shredded for a softer, more fur-like appearance.
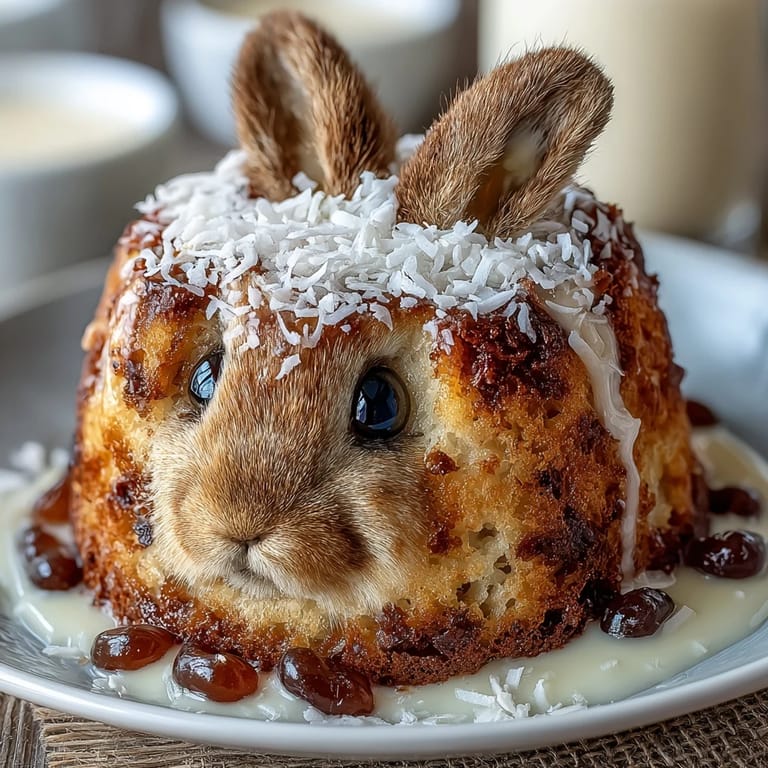
- Jelly beans (1 pink for tail, 4 white for paws, 4 small pink for paw pads, 2 for eyes): These bring joy and color; pick sturdy ones that won't sink into warm frosting.
Tired of Takeout? 🥡
Get 10 meals you can make faster than delivery arrives. Seriously.
One email. No spam. Unsubscribe anytime.
Instructions
- Set the stage:
- Preheat your oven to 350°F and grease those round pans like you mean it—bunny cakes have earned the right to come out cleanly. Get your ingredients out and lined up; room temperature eggs and butter blend faster and smoother than cold ones.
- Build the dry base:
- Whisk flour, baking powder, baking soda, and salt together in a medium bowl, making sure there are no hiding pockets of baking soda that'll taste bitter. This step takes thirty seconds and saves you from streaky, unevenly risen cakes.
- Cream butter and sugar:
- Beat softened butter and sugar together until the mixture is pale, fluffy, and smells almost like butterscotch—this usually takes 3 to 4 minutes with an electric mixer. This creaming action is what traps air in the batter, making the cake light enough to actually carve later.
- Bring the eggs in gently:
- Add eggs one at a time, beating well after each one, then pour in vanilla and let it mix. The batter should look smooth and slightly thick, not curdled or separated.
- Layer flour and milk:
- Starting and ending with flour, alternate adding the dry mixture and milk to the butter mixture, stirring just until combined after each addition. Overmixing at this stage will make the cake tough, so stop as soon as you don't see streaks of flour anymore.
- Bake the layers:
- Divide batter evenly between your prepared pans and slide them into the oven for 30 to 35 minutes, until a toothpick poked in the center comes out clean. The kitchen will smell incredible, and that's when you know you're on the right track.
- Cool with patience:
- Let the cakes rest in their pans for 10 minutes—this allows them to set just enough to handle—then tip them onto a wire rack to cool all the way through. Warm cake is crumbly cake, and you need stable layers for sculpting.
- Make frosting magic:
- Beat softened butter until it's creamy and pale, then gradually add sifted powdered sugar in batches to avoid a powdery cloud. Add vanilla and milk, a little at a time, until the frosting is spreadable but still firm enough to hold the bunny's shape.
- Engineer the bunny body:
- Place one whole cake round on your serving platter as the bunny's body. Cut the second round in half and stand those semicircles upright at one end, using frosting as glue to create the back and head.
- Carve ears and paws:
- From the remaining cake scraps, cut two ear shapes and two paw shapes with a serrated knife, using frosting to attach them to the bunny. Don't worry about perfect geometry; bunny ears are supposed to look a little quirky and natural.
- Frost generously:
- Spread frosting all over the bunny, getting into the crevices and covering every exposed crumb. This frosting layer is your canvas and your glue for the coconut fur.
- Apply the fur:
- Press shredded coconut firmly onto the frosted bunny, working in sections and patting it down so it sticks. The texture will look soft and fluffy, just like a real bunny's coat.
- Add personality:
- Place the large pink jelly bean at the base for a fluffy tail, press white jelly beans onto the paws, and add tiny pink ones as paw pads. Finish with mini chocolate chips or black jelly beans for eyes, and if you're feeling fancy, tint some coconut pink with food coloring and sprinkle it on the ears.
- Chill before serving:
- Pop the bunny into the refrigerator for at least an hour before guests arrive so the frosting sets and everything holds together beautifully. This is also when you can catch your breath and admire what you've made.
 Save
Save There's something about watching a bunny emerge from cake layers and frosting that reminds you why people bake in the first place. It's not about perfection or Instagram photos; it's about creating something that makes someone smile before they even taste it.
Why Shredded Coconut Changes Everything
The first time I tried making this bunny, I used larger coconut flakes thinking it wouldn't matter. The bunny looked shaggy and lopsided, like it needed a serious grooming session. Switching to finely shredded coconut transformed it completely—the texture became soft and fur-like instead of chunky and strange. Now I always grab the sweetened shredded kind, which presses onto frosting like it belongs there.
The Carving Confidence You Need
Cutting cake shapes from baked layers sounds intimidating until you realize that frosting forgives almost everything. A wobbly ear gets propped up by frosting; a crooked paw gets hidden under coconut. I use a serrated knife with a gentle sawing motion rather than pressing down hard, which prevents crumbles and gives cleaner cuts. Take your time, and remember that a bunny with character beats a perfect bunny every single time.
Decorating Like You Mean It
The jelly beans are where this cake goes from impressive to unforgettable. I learned the hard way that pressing them into warm frosting makes them sink and disappear, so I always chill the frosted bunny first. A pink jelly bean tail catches light and adds instant whimsy, while white paws with pink pads feel like you actually have a real bunny sitting on your table. The eyes are the final touch—they give the bunny personality and turn it from a dessert into a character.
- Chill the frosted bunny before adding jelly beans so they stay perched on top instead of sinking in.
- Use sturdy jelly beans that won't dissolve if someone brushes against the cake, and save soft or already-melted ones for eating, not decorating.
- Step back and look at your bunny from different angles before declaring it done; sometimes a tiny adjustment to an ear or eye position makes all the difference.
 Save
Save This bunny cake has become the centerpiece of our Easter table, the thing everyone asks about before dessert is even mentioned. It's proof that home baking doesn't have to be complicated to be spectacular.
Common Questions
- → How is the bunny shape created?
The bunny shape is formed by cutting one cake round into semicircles for the back and head, while the other round provides ears and paws. These pieces are attached with frosting to build the bunny figure.
- → What gives the cake its fluffy fur appearance?
Sweetened shredded coconut is pressed over the frosted cake to resemble the bunny's furry coat, with some tinted pink for ear details.
- → Can the cake be made dairy-free or gluten-free?
You can substitute gluten-free flour and use dairy-free butter and milk alternatives for dietary needs, though texture and flavor may vary slightly.
- → What flavors complement this cake well?
Adding lemon or almond extract to the batter enhances the cake’s flavor, creating a bright and subtle nutty tone that pairs well with the coconut topping.
- → How should the cake be stored before serving?
Once decorated, the cake should be chilled to set the frosting and decorations, then kept covered in the refrigerator until ready to serve.