Save
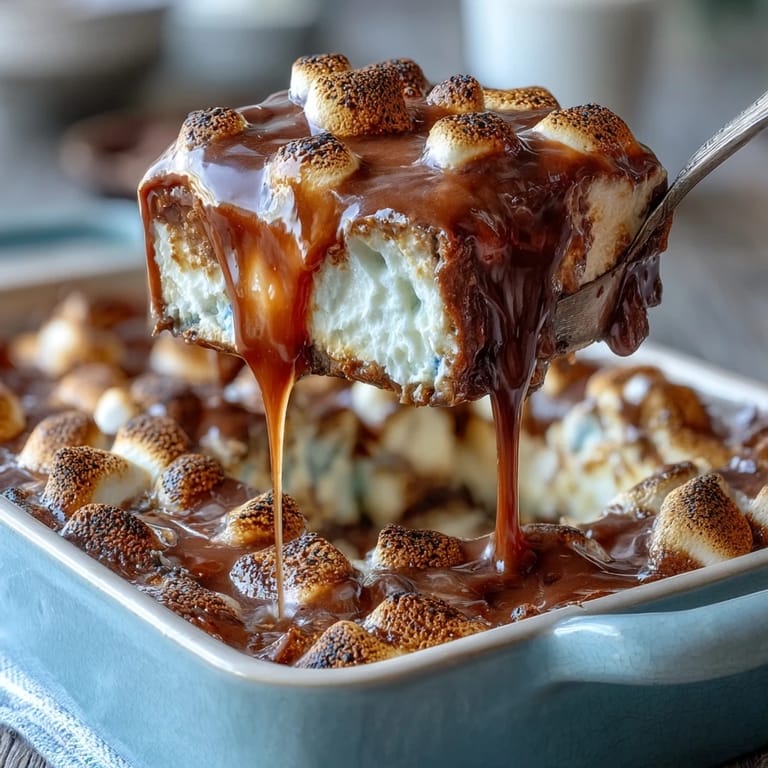
Save My sister called me panicked on July 3rd asking what to bring to the neighborhood cookout, and I blurted out this s'mores dip idea without thinking it through. Turns out, throwing chocolate and marshmallows into a cast iron skillet and letting the oven do the heavy lifting is exactly the kind of genius move that saves you when you're short on time. The beauty of it is that everyone gravitates toward the skillet like moths to a flame, and suddenly you're the person who made the most effortless-looking dessert that tastes like nostalgia tastes.
I watched my neighbor's ten-year-old daughter come back for thirds, dunking graham crackers into that warm chocolate-marshmallow pool like it was the best thing she'd ever tasted. Her dad joked that she'd forgotten all about the fireworks, and honestly, seeing people light up over something you made in twenty minutes feels pretty close to magic. That's when I realized this dip isn't just dessert—it's a moment maker.
Ingredients
- Semi-sweet chocolate chips (2 cups): Don't swap these for dark chocolate unless you want a more bitter bite—the semi-sweet version hits that nostalgic s'mores note perfectly, and I learned this the hard way by experimenting with fancy chocolate.
- Unsalted butter (1 tablespoon): This tiny amount loosens the chocolate just enough so it spreads evenly without seizing, and it keeps the flavors from getting muddled.
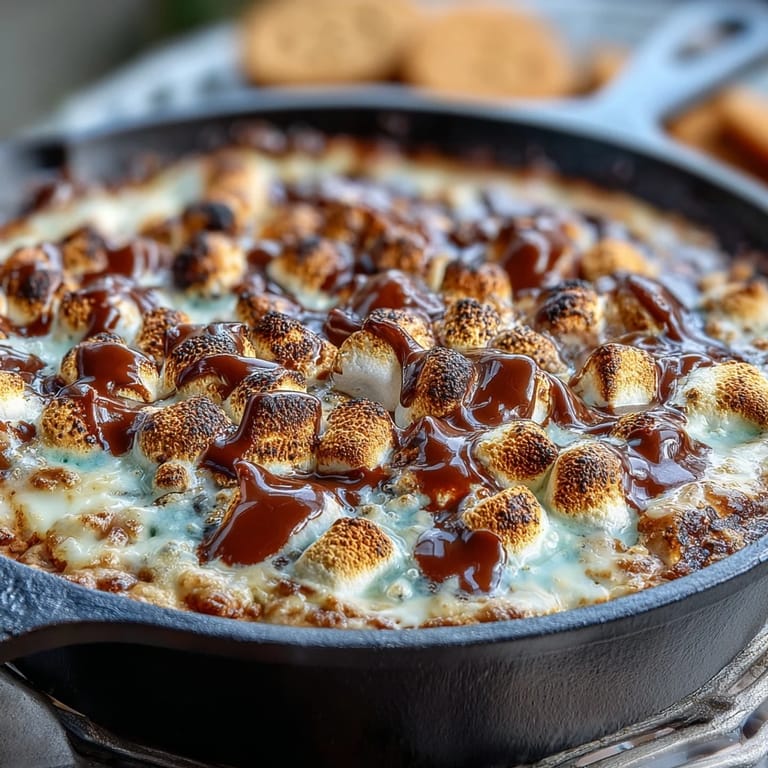
- Large marshmallows (3 cups): Go for the actual large ones, not the mini bag—they toast gorgeously and give you those charred edges that make the whole thing taste authentic.
- Graham crackers (16 pieces, broken): Breaking them into pieces means everyone can grab a chunk without the awkward whole-cracker wrestling match.
- Red, white, and blue chocolate candies (1/4 cup, optional): These are your visual punch for the holiday—sprinkle them on top while the marshmallows are still hot so they stick.
- Strawberries and blueberries (1 cup each, optional): Fresh berries give you a bright, tart contrast to all that richness, and they make the whole thing look like you planned it.
Tired of Takeout? 🥡
Get 10 meals you can make faster than delivery arrives. Seriously.
One email. No spam. Unsubscribe anytime.
Instructions
- Heat your oven and prep the skillet:
- Set your oven to 400°F and grab your cast iron—this temperature is hot enough to melt chocolate fast without burning it. Having everything ready before you start means you're not scrambling when things happen quickly.
- Melt the chocolate and butter together:
- Put the chocolate chips and butter in the skillet and slide it into the oven for 3 to 4 minutes until just softened. When you pull it out, the butter will be melted and the chocolate will look like shiny pebbles, ready to transform with a quick stir into silky smoothness.
- Create an even chocolate base:
- Stir the melted chocolate and butter until it's completely smooth with no streaks—this takes maybe thirty seconds and makes all the difference. You want a glossy, even layer that covers the entire bottom of the skillet.
- Layer on the marshmallows:
- Arrange your marshmallows in a single layer over the chocolate, pressing them down gently so they nestle in and won't shift around. They don't need to be perfect—rustic actually looks better here.
- Toast until golden:
- Back into the oven for 5 to 7 minutes, watching through the window as the marshmallows puff up and turn golden brown on top with little charred spots. You'll smell the toasty sweetness starting to fill your kitchen, and that's your cue to stay nearby.
- Add your finishing touches:
- Pull it out and immediately sprinkle those colorful candies over the hot marshmallows if you're using them—the heat makes them stick perfectly. Let everything settle for 3 to 5 minutes so it's warm but not lava-level hot.
- Serve and watch it disappear:
- Set that skillet down on a trivet surrounded by your graham crackers, berries, and whatever dippers you've got, then step back and let people dig in. The warm, gooey center is the magic moment here.
 Save
Save My brother's girlfriend, who's usually the type to leave parties early, ended up staying an extra hour just hanging around the dip station, refilling her plate and laughing with strangers. Food has this quiet power to make people linger, and this dip—messy, communal, warm—does exactly that.
Why Cast Iron Matters Here
Cast iron holds heat like nothing else, which means your dip stays warm and pourable for way longer than it would in a regular baking dish. The uneven heating of the skillet also creates those little crispy chocolate bits on the edges that people fight over—that's not a flaw, that's a feature. Plus, bringing it straight from oven to table on a trivet looks intentional and impressive without any extra work.
Flavor Twist Ideas
Once you nail the basic version, you can start playing around with add-ins that make it entirely your own. I've sprinkled a tiny pinch of sea salt over the chocolate before the marshmallows go on, and the salt-sweet contrast completely changed the game. Someone else drizzled peanut butter over the melted chocolate layer, and that brought a whole new richness that made it taste almost decadent.
Make-Ahead and Storage Tips
You can't really make this ahead because the magic is in serving it warm and gooey, but you can prep everything else before guests arrive. Measure out your chocolate and butter, arrange your marshmallows on a plate, cut your berries, and set up your dipping station so you're literally just sliding the skillet into the oven when people are ready for dessert. The whole thing takes twenty minutes from start to table, which is the whole point.
- Store leftover dip covered in the fridge for a day, but honestly it tastes best fresh and warm.
- You can absolutely double this recipe in a larger skillet if you're feeding a bigger crowd.
- If you end up with leftover marshmallows, throw them in hot chocolate or eat them straight—there's no universe where marshmallows are a problem.
 Save
Save This dip became my go-to because it feels special without making you feel stressed, and somehow it always ends up being the thing people remember most about the party. There's something deeply satisfying about feeding people something warm and sweet that tastes like celebration.
Common Questions
- → What type of chocolate works best for this dessert?
Semi-sweet chocolate chips melt smoothly, delivering a rich, balanced sweetness that complements the toasted marshmallows perfectly.
- → Can I prepare this ahead of time?
It’s best served warm right after baking to enjoy the gooey texture, as it tends to harden upon cooling.
- → What alternatives can I use for serving besides graham crackers?
Try sliced strawberries, blueberries, or other sturdy fruits for dipping to add fresh contrast and variety.
- → How do I achieve the perfectly toasted marshmallows?
Bake on a high oven temperature (around 400°F) just until the marshmallows turn golden brown on top, typically 5–7 minutes.
- → Is the cast iron skillet necessary?
A cast iron skillet distributes heat evenly and helps achieve the classic toasted finish, but a similar oven-safe baking dish can be used.