 Save
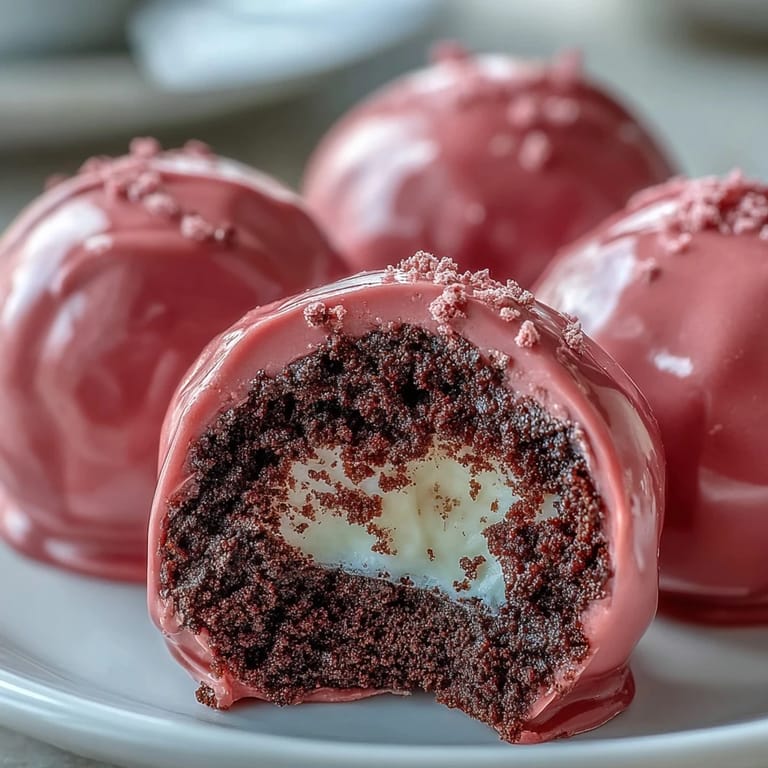
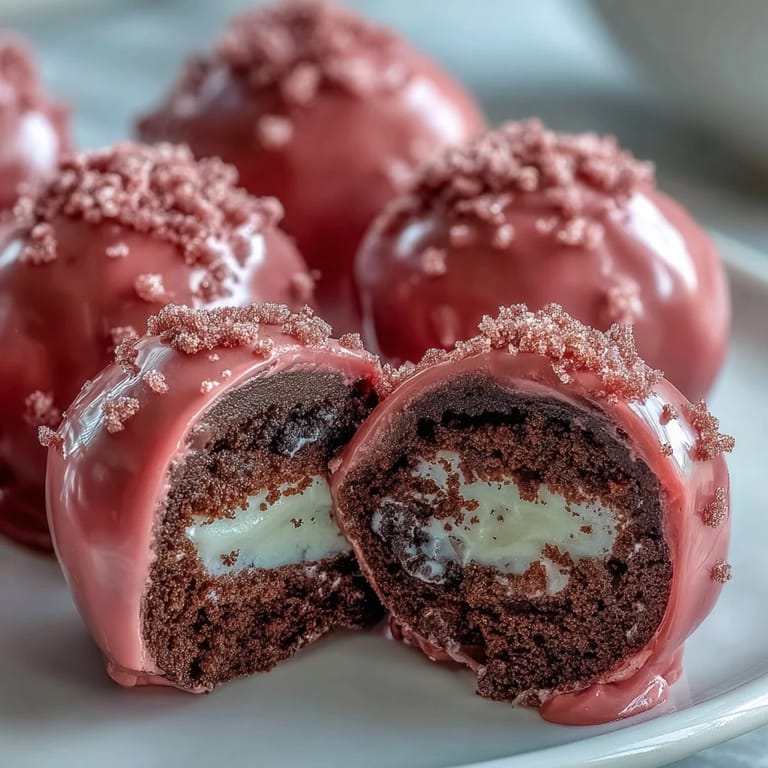
Save My sister showed up one Saturday with a container of these bright pink spheres, and I thought they were store-bought until I bit into one. The snap of the candy shell gave way to something so creamy and familiar that I immediately recognized the Oreo filling mixed with cream cheese. She laughed at my shocked expression and admitted she'd made them in under an hour. That same evening, I was already crushing cookies in my own kitchen, determined to master what turned out to be the easiest impressive dessert I've ever made.
I brought a batch to a baby shower last spring, and they disappeared faster than anything else on the dessert table. One friend kept coming back, stacking three on her napkin each time, insisting they were too small to count as full servings. The hostess asked for the recipe twice before the party even ended. I've since made them in blue, yellow, and classic white, but the pink version always gets the most enthusiastic reaction, especially from kids who treat them like edible gems.
Ingredients
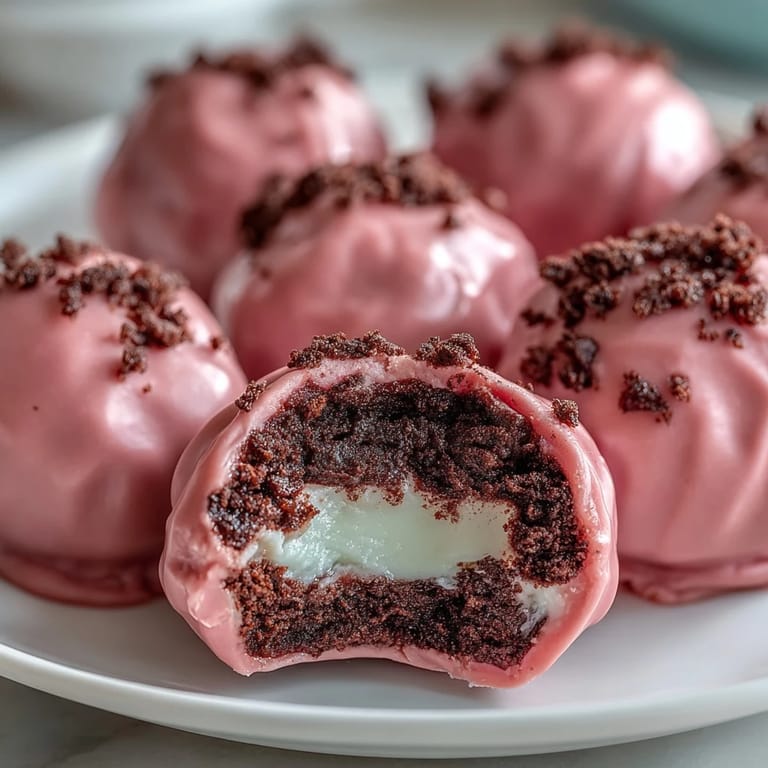
- Oreo cookies: Use the whole cookie, filling and all, for that signature flavor and the right creamy-to-crunchy ratio when mixed with cream cheese.
- Cream cheese: Let it sit on the counter for at least 30 minutes so it blends smoothly without lumps, creating a truffle base that rolls easily.
- Pink candy melts: These set firm at room temperature and give you that glossy, professional-looking shell; oil-based coloring works if you prefer to tint white melts yourself.
- Vegetable shortening: A small spoonful thins the candy coating just enough to make dipping smoother and the finish shinier.
- Sprinkles or edible pearls: Completely optional, but they add a playful touch and help guests spot the truffles from across the room.
Tired of Takeout? 🥡
Get 10 meals you can make faster than delivery arrives. Seriously.
One email. No spam. Unsubscribe anytime.
Instructions
- Crush the cookies:
- Pulse the Oreos in a food processor until they become fine, even crumbs with no large chunks remaining. If you don't have a processor, seal them in a zip-top bag and roll firmly with a rolling pin until uniformly fine.
- Mix the truffle base:
- Combine the cookie crumbs and softened cream cheese in a bowl, stirring with a spatula until the mixture turns a uniform dark color and holds together when pressed. The texture should feel like dense cookie dough that no longer crumbles.
- Shape the truffles:
- Scoop a tablespoon of mixture and roll it between your palms into a smooth ball, applying gentle pressure so it holds its shape. Line them up on a parchment-covered baking sheet as you go.
- Chill until firm:
- Refrigerate the shaped truffles for 30 minutes or freeze for 15 minutes so they firm up enough to dip without falling apart. Cold truffles also help the candy coating set faster and more evenly.
- Melt the candy coating:
- Microwave the pink candy melts in a bowl at medium power in 30-second bursts, stirring after each interval until completely smooth. Stir in the vegetable shortening if you want a thinner, glossier coating that drips off more easily.
- Dip each truffle:
- Use a fork to lower each chilled truffle into the melted candy, turning gently to coat all sides, then lift and tap the fork against the bowl edge to shake off excess. Slide the coated truffle back onto the parchment-lined tray.
- Decorate while wet:
- Immediately add sprinkles or edible pearls while the coating is still liquid so they stick without sliding off. Work quickly, especially if the room is warm.
- Let the coating set:
- Allow the truffles to sit at room temperature until the candy shell hardens, or speed up the process by chilling them in the fridge for 10 to 15 minutes. Once set, they should feel smooth and dry to the touch.
- Store and serve:
- Keep the finished truffles in an airtight container in the refrigerator for up to a week, and serve them chilled for the best texture contrast. They taste even better after a day, once the flavors have melded together.
 Save
Save One evening, my daughter helped me roll the truffle balls, and she insisted on making a few extra-large ones for herself. When we dipped them, the big ones cracked slightly under the weight of the coating, but she didn't mind at all. She declared them her special giant truffles and guarded them in the fridge for two days. That's when I realized these little treats aren't just about the recipe; they're about the moments you create while making them, even the imperfect ones.
Choosing Your Candy Coating
Pink candy melts are my go-to because they're consistent and easy to work with, but I've also used white melts tinted with oil-based food coloring when I want a custom shade. Avoid water-based coloring at all costs, as even a drop will ruin the texture. If you prefer a richer chocolate flavor, try using tempered dark or milk chocolate instead of candy melts, though the process requires a bit more attention to temperature. I've found that candy melts are more forgiving for beginners and still deliver that satisfying snap.
Make-Ahead and Storage Tips
These truffles actually improve after a day in the fridge, as the flavors meld and the texture becomes even creamier. I often make a double batch on Sunday and keep them stored in a single layer in an airtight container, separated by parchment paper to prevent sticking. They hold up beautifully for a full week, and I've even frozen uncoated truffle balls for up to a month, then thawed and dipped them later when I needed a quick dessert. Just remember to bring them back to room temperature slowly before dipping, or condensation can affect the candy coating.
Customizing for Any Occasion
The beauty of this recipe is how easily it adapts to different themes and tastes. I've swapped pink candy melts for red at Valentine's Day, green for St. Patrick's Day, and orange for Halloween, each time adjusting the sprinkles to match. You can also fold in mini chocolate chips, finely chopped nuts, or shredded coconut into the truffle base for added texture and flavor. One friend even drizzled white chocolate over the pink coating in thin lines, creating a marbled effect that looked bakery-perfect.
- Try using mint Oreos and green candy melts for a refreshing twist during the holidays.
- Roll finished truffles in crushed cookies or cocoa powder instead of dipping them for a rustic, no-melt option.
- Package them in clear cellophane bags tied with ribbon for edible gifts that feel personal and thoughtful.
 Save
Save These Oreo truffle balls have become my signature contribution to potlucks and parties, and I love watching people take that first bite and light up with surprise. They're proof that something simple can feel special, and that a little pink candy coating can turn an ordinary evening into something worth remembering.
Common Questions
- → How long do these truffle balls keep fresh?
Store these in an airtight container in the refrigerator for up to one week. The chilled texture is actually optimal—the coating stays firm while the center remains creamy. They can also be frozen for up to three months, though the candy coating may develop slight condensation when thawing.
- → Can I use different colors for the candy coating?
Absolutely. Swap pink candy melts for any color that matches your occasion—red for holidays, pastel for spring, or keep it classic with white. Use oil-based food coloring to tint white candy melts any shade you desire. Avoid water-based coloring as it will seize the chocolate.
- → Why is my coating cracking or not setting properly?
Coating cracks usually happen when the truffle centers are too cold, causing temperature shock. Let chilled balls sit at room temperature for 5 minutes before dipping. If coating won't set, the room may be too warm or humidity is high. Try adding 1 teaspoon vegetable shortening to thin the mixture and refrigerate dipped truffles to help them set.
- → What's the best way to crush the Oreos evenly?
A food processor gives the most consistent fine crumbs in just seconds. If using the zip-top bag method, press firmly with the rolling pin and check for larger pieces. Some texture is nice, but large chunks make rolling difficult. Aim for sand-like consistency with some small cookie pieces remaining.
- → Can I make these without candy melts?
White chocolate or semi-sweet chocolate can substitute for candy melts, though the consistency may differ. Chocolate requires tempering for a glossy finish and may be softer at room temperature. Candy melts are formulated specifically for coating—they set firm without tempering and come in vibrant colors.
- → What's the purpose of chilling the truffle centers before dipping?
Chilling firms the mixture, making it easier to handle and dip without falling apart or leaving crumbs in your coating. Thirty minutes in the refrigerator or 15 minutes in the freezer achieves the right consistency—firm but not frozen solid. Overly cold centers can cause the coating to crack, while warm centers may slide off the dipping fork.