 Save
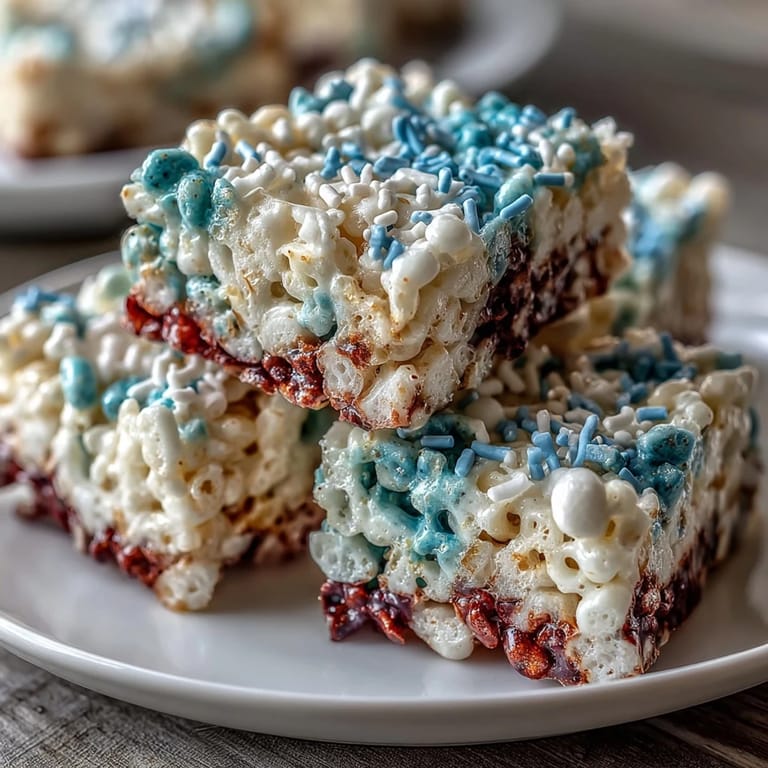
Save Every Fourth of July, my kitchen transforms into a patriotic command center, and these layered Rice Krispies treats have become the unofficial flag of our dessert table. There's something about stacking red, white, and blue that makes even the simplest recipe feel like a celebration. My kids press their noses against the counter as each color gets added, trying to guess which layer will taste sweetest. The whole process takes maybe thirty minutes, but the anticipation stretches it into an afternoon event. It's become the one dessert everyone requests before the fireworks even start.
I'll never forget the year my neighbor stopped by mid-prep and watched me carefully press the blue layer on top of white on top of red, her eyebrows raised in skepticism. She left with a single square and came back twenty minutes later asking for the recipe, already planning to make them for her own family dinner. That's when I realized these treats are less about technique and more about the conversation they spark around a table.
Ingredients
- Rice Krispies cereal, 6 cups: Use the classic version for that nostalgic snap and crackle—store brands work fine, but they compress slightly differently, so you might need to add an extra handful if yours seems sparse.
- Mini marshmallows, one 10 oz bag: The mini size melts more evenly than jumbo, and dividing them into thirds becomes your visual guide for making sure each layer is the same height.
- Unsalted butter, 3 tbsp total: Low heat is your friend here; rushing the butter or letting it brown even slightly changes the whole texture of the final treat.
- Vanilla extract, 1/2 tsp: This goes exclusively into the white layer, giving it a subtle sweetness that balances the gel coloring and prevents it from tasting flat.
- Red gel food coloring: Gel, not liquid—I learned this the hard way when liquid food coloring turned my red layer into a sticky mess that never quite set.
- Blue gel food coloring: Same rule applies; just a few drops goes a long way, and you can always add more if you want a deeper shade.
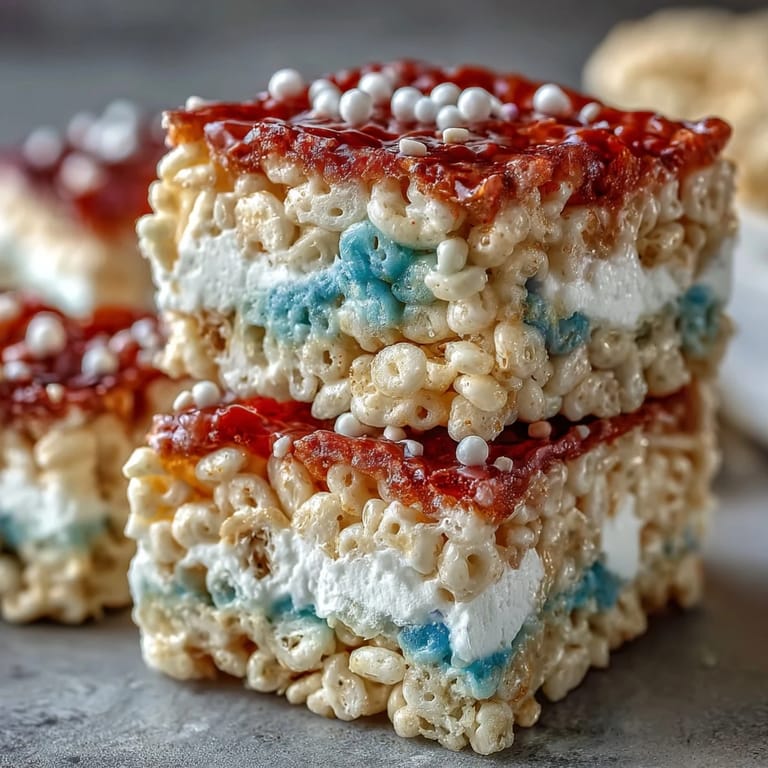
- Red, white, and blue sprinkles, optional: Add these while the top layer is still warm enough that they stick slightly, giving you that festive finish without extra steps.
Tired of Takeout? 🥡
Get 10 meals you can make faster than delivery arrives. Seriously.
One email. No spam. Unsubscribe anytime.
Instructions
- Set your stage:
- Line a 9x9-inch baking pan with parchment paper and give it a light grease so your finished treats lift out cleanly and your hands don't stick during pressing. This two-minute setup prevents thirty minutes of frustration later.
- Divide everything into thirds:
- Measure out roughly 3 1/3 cups of marshmallows and separate them into three portions, then divide your 3 tablespoons of butter the same way. Having everything portioned before you start means you won't second-guess yourself mid-layer.
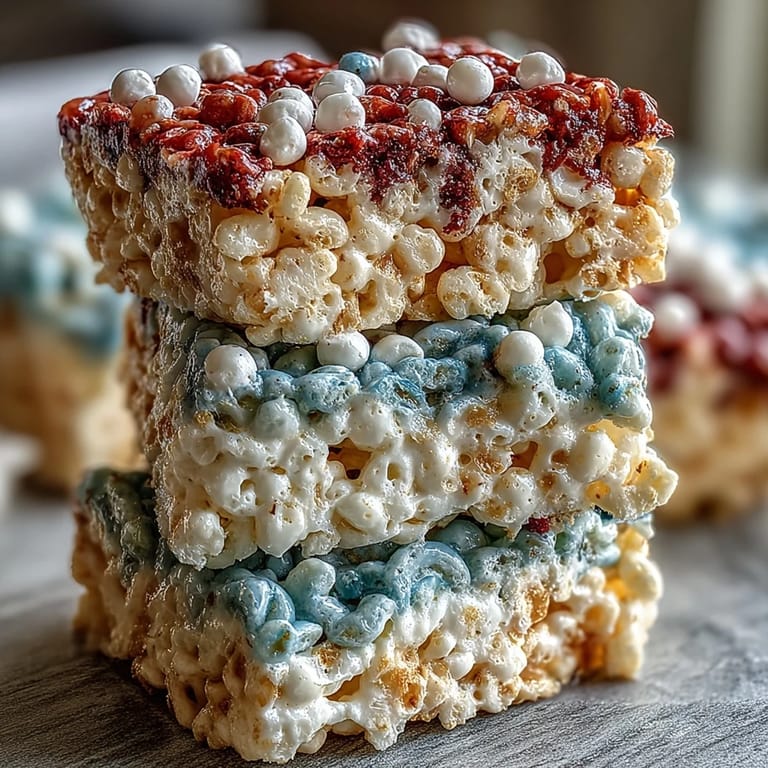
- Make the red layer:
- Melt 1 tablespoon of butter over low heat, add your first batch of marshmallows, and stir gently until completely smooth—this takes about two minutes and should feel like stirring a warm cloud. Once melted, add just a few drops of red gel coloring and stir until you reach a shade you love, then fold in 2 cups of Rice Krispies until every piece is coated evenly.
- Press and set:
- Pour the red mixture into your prepared pan and press it down evenly with a lightly greased spatula or the back of a greased spoon, making sure it reaches all four corners. Don't press so hard that you crush the cereal; you want it compact but still slightly airy.
- Build the white layer:
- Wipe your saucepan clean, melt 1 tablespoon butter, add the second batch of marshmallows, and stir until smooth just like before. Stir in your vanilla extract—this is what makes the white layer taste distinctly different from the others—then add 2 cups of Rice Krispies and fold gently.
- Layer with care:
- Gently press the white mixture over the red layer, using that same greased tool to spread it evenly without smooshing everything together. You'll feel the slight warmth transferring between layers, which actually helps them bond slightly.
- Create the blue crown:
- Repeat the process one final time: clean saucepan, melt the last tablespoon of butter, add remaining marshmallows, and stir until glossy. Add a few drops of blue gel coloring and fold in your remaining 2 cups Rice Krispies.
- Top it off:
- Press this final layer gently and evenly over the white layer, then immediately sprinkle your red, white, and blue sprinkles over the top if you're using them—they'll stick to the lingering warmth. Skip this step if you prefer a cleaner look or if you're saving them for decorating after cutting.
- The hardest part—waiting:
- Let everything cool and set for at least one full hour at room temperature; resist the urge to cut into it sooner or the layers will crack and separate. Patience here is what transforms a warm, slightly messy mixture into those perfect, clean-cut squares.
- Slice and celebrate:
- Use the parchment paper to lift the entire block out of the pan, then cut into sixteen equal squares with a sharp knife, cleaning the blade between cuts so you get clean edges. Serve immediately or store in an airtight container, and watch people's faces light up when they bite into that three-color surprise.
 Save
Save My favorite moment with this recipe came when my uncle, who usually sits quietly during family gatherings, took one bite and suddenly became animated, pointing out how the vanilla made the white layer taste different from the others. Simple as that—a dessert that actually rewards paying attention to the details, creating texture and flavor differences that make people pause and really taste what they're eating.
The Color Science Behind Your Treat
Gel food coloring works because it's concentrated pigment in a gel base, meaning you need only tiny amounts to achieve vibrant colors without adding liquid that thins out your marshmallow mixture. I discovered this after a frustrating year of pink layers instead of red and pale blue instead of that deep patriotic shade I was aiming for. The viscosity of your mixture matters too—too thick and spreading becomes a struggle, too thin and your layers start blending together. Getting comfortable with that sweet spot between warm and workable is what separates muddy-looking treats from those perfect color-separated squares that photograph so well you almost feel bad cutting into them.
Pressing Technique That Actually Works
The most common mistake I see people make is either not pressing firmly enough, leaving airy gaps that cause layers to separate, or pressing so hard they crush all the cereal and end up with a dense, almost hard bar that tastes more like compressed fluff than a treat. The sweet spot feels like a gentle but confident pressure—you're creating contact between pieces without destroying the structure. Greasing your hands or tool is essential; sticky hands make you press harder than necessary because you're fighting the drag. I've learned that lightly greasing and then wiping off excess is better than creating a slick surface, which can actually prevent good layer adhesion.
Flavor Variations Worth Trying
While the classic version is perfect for the holiday itself, I've experimented with tweaks that keep these interesting beyond July Fourth. A pinch of sea salt in each layer deepens the marshmallow flavor and balances the sweetness beautifully, and using salted butter instead of unsalted gives you that subtle salty-sweet thing that makes people eat another square without realizing it. For the white layer, I've tried almond extract instead of vanilla for something a bit more sophisticated, though vanilla remains undefeated in my kitchen. You could also divide a single batch of marshmallows and color them differently if you want to get creative with stripes or patterns instead of layers.
- Try swapping vanilla for almond extract in the white layer for a subtle flavor upgrade that most people can't quite identify but definitely notice.
- Add a small pinch of sea salt to each layer during the stirring stage to enhance the marshmallow flavor and prevent the treat from feeling overly sweet.
- Store in an airtight container with parchment between layers if stacking, and they'll stay fresh for three full days without losing their snap.
 Save
Save These treats have a way of becoming less about independence and more about gathering—the kind of simple, colorful dessert that reminds people why they showed up. Make a batch and watch how quickly conversation shifts toward this dish, how people slow down to actually appreciate the layers.
Common Questions
- → How do I achieve vibrant red and blue colors?
Use gel food coloring for more intense and stable shades compared to liquid coloring, which can alter the texture.
- → Can I use salted butter instead of unsalted?
Yes, salted butter adds a subtle saltiness that complements the sweetness, enhancing overall flavor.
- → What is the best way to prevent sticking when pressing layers?
Lightly grease your hands or use a spatula to press the layers evenly without the mixture sticking.
- → How long should these treats cool before slicing?
Allow at least 1 hour for the layers to set firmly before removing from the pan and slicing.
- → Can I customize the decoration on top?
Yes, you can add sprinkles or other edible decorations while the top layer is still slightly warm for easy adhesion.